Level 3 FMP
FMP Project Level 3
This is my FMP where the brief is open, meaning I can choose whatever I would like to design. But this needs to be negotiated with my tutor.


This is my FMP where the brief is open, meaning I can choose whatever I would like to design. But this needs to be negotiated with my tutor.

Project Plans:
28/02/2018

Mood Board:

This mood board is a compilation of images that show the sort of aesthetic that I want to create in my concept piece. I use this to help me get a general idea of what my overall concept will look and the feel it should have, for instance this mood board shows that my concept should have a mystical and fantasy sort of feel but also with an aspect of creepy and miserable.
Mindmap:

This mind map is used to help me decide what I want to put into my concept and helps me to also pick possible changes for the concept. I have created this to help me figure out what will be included in my concept, in this mind map I was deciding how each part of my environment will look.
________________________________________________________________________
Software used
In this project I could use software such as Photoshop and Maya to create the concept for this project.This is because they have many tools that make creating my concepts easier at a higher level of detail.
In my opinion I am confident in my skills with 2D work and creating creature concepts because it is what I am more passionate about and have had more practice with so I feel my skills are much better suited for 2D work at the moment but I do plan to further develop my skills in 3D for future endeavours.
Project Plan:
05/03/2018


07/03/2018


Project plan:
16/03/18


Project Plan:
19/03/18

Silhouettes:


Proposal
I have decided to design a creature for m FMP.


From all of the silhouettes I did the last one from this page was my most interesting to me. These silhouettes helped me to choose which idea was the best bu seeing which picture had the most potential in my eyes. I created them by using black colouring and a soft brush and just starting to doodle very random shapes and then when they start to some together I develop them into better ideas.

This mood board is to show all the different animals that are included in my creature. There is elements of rabbit, hare, deer and porcupine in my creature. This will help me to determine everything that my creature will have and how my creature will look, this helps me to get it as close to realistic as I can.

Experiments:
Here I did some experiments to help me decide what I would like to use in my design. These iterations will help me to gain a grasp of what my creature will be like, how the shape will be, shading, everything to do with my creature will have to do with these.


Research:


In this project I will intend to create these environments, of the cramped, dark, cramped conditions.
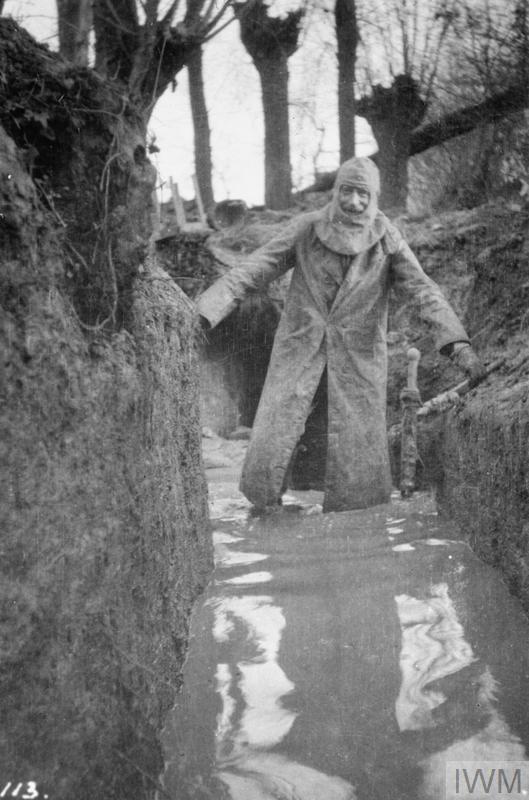

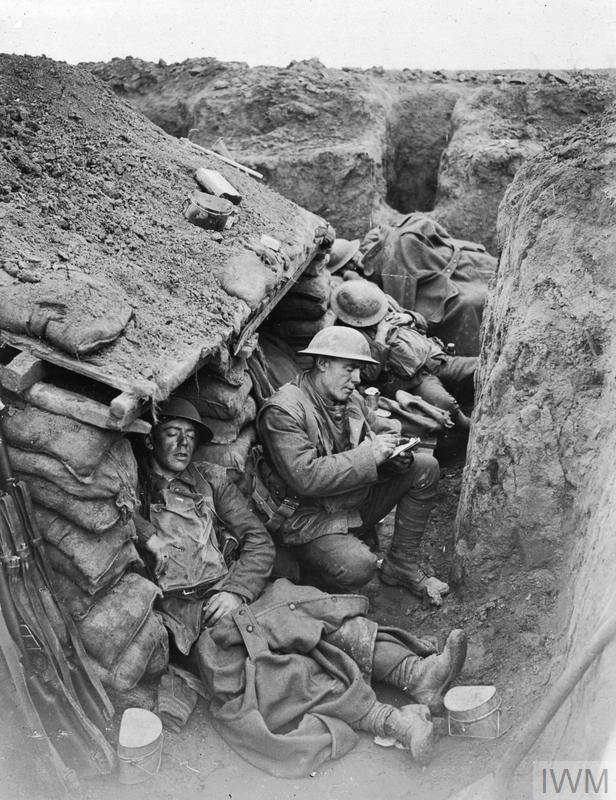
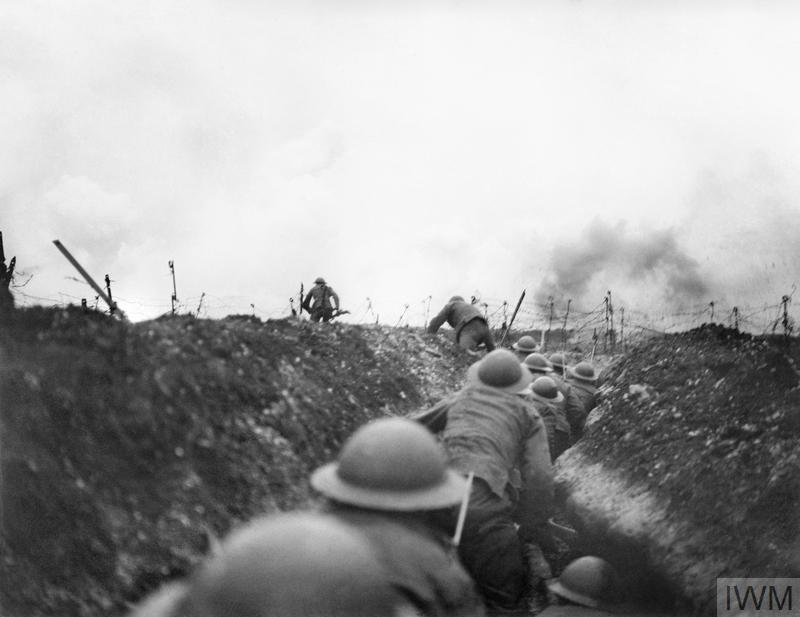

These pictures have helped give me a sense of not only what it looked like, but also the emotions these people had, how they knew they would be in constant danger all the time, and yet in this pictures you can still see that some of them have smiles, the times were so dark and depressed but these men still manged to show a sense of happiness, reading letters from home and knowing they would come back to their families.
New proposal:


References


This is the picture I will be using to create my scene by drawing over it and changing bits of it to suit my full idea. This has helped me to understand how the natural aspect of my environment will look because all the assets I have used to create this are natural objects found in the world normally, but I use them to create an alienated aesthetic and create a strange and whimsical environment. This method is used in the industry to help designers create a realistic environment. I could have improved on this by actually going outside to also get a sense of depth into the image such as how the grass will look.


This is how my concept has turned out so far, I am showing the full development of how I created this idea, form the actual physical real life concept to what I have drawn over that with. I am quite happy with how it looks so far, i'm pleased with the lighting I have created and how the tree looks.
Tree bark experiments:


These experiments are to show how I have developed my skills at drawing tree bark, this is something that I have needed to improve on greatly seeing as drawing trees is not my strongest point. So I had practised drawing the tree bark and also how to make it fit into my concept. This helped me because I managed to further my skills with drawing and blending and I am pleased with how they all turned out.
Damage ideas:


These pictures are of some special effects makeup that I have created and could use to show damage on my creature. I used these because they are very realistic so it helps me to gain a better understanding of how the damage will look on the creatures body.

Idea change over:
I really do not like how this concept has looked so now I decided to change how my environment will look.

I decided to change my concept because I didn't like how the concept was looking very bad in my eyes, I did not like how the perspective was going to look and the tree was not how I intended it to look at all. I am happy that I have decided to change my project because it gives me more of a chance to create something with more potential.

Here are the ideas I have drawn up for the new environment. I am creating an environment that is on a much larger scale then the previous because it seemed like it had more potential for development and detail and that I had more for me to work with. and from when I first thought of the idea, I already knew it would be better then my first idea.


This is the start of the new design and development. I really how I have drawn it up with the sketchover, I think that it's has a really nice realistic feel to it but can also fit into my fantasy environment.


I have chosen to do this environment idea because I really liked how it looked and the amount of potential that it has. I made a note of all the base colours I have used so that when I need to do blending it is easy to pick out the base colouring of what I need to blend together.


Artists interpretation:

This piece of work that inspired me was created by Benedick Bana and is called "Mystic Night". I have been inspired by this art due to the lighting used in the concept on the trees and also with eh reflections in the water. This concept really appeals to me because of the fantasy style. I intend to try and give my concept piece the same sort of feel. I have used a soft brush where as the artist has created hard edges as well as soft blends.

I decided to go over one of the trees to make it neater and give it those hard edges like the artist has. So I used the pentool to make these hard edges. I drew around the tree with the tool and then I worked on the inside with the normal brush to neaten the inside of it and the used the inverse setting with the select to fix and harden the outside.


Gradient Experiments
Normal

Overlay

Soft Light

I have used gradient masking to help me graduate the depth and detail in my concept so that everything looks better and has more detail, but I used an easier method to make it less times consuming, giving me more time to focus putting greater detail in where it is needed.


These are rocks that I have used as references to create the textures on my cliff and on my rocks, this has helped me to create a realistic texture showing me all the dents and scratches and concave parts of the rocks. I really liked the look of the first rock, it has a very smooth exterior and a really nice pattern on it.
Colour Picker Problem:
I was having a problem with my colour picker tool (alt+drag over desired colour) so I tried to research into it and nothing helped my situation so then I went through everything I could think of because the colour picker is how I do all of my blending and my main tool in soft painting.


So for anyone who has this problem i resolved it by turning off all layers except the main the layer where the colour is, then it shouldn't pick up on any background layer colours and this fixed my issue and my colour picker was finally picking up the right shade I wanted.
Full Development:


Evaluation:
This project was about creating a concept using either Maya
or Photoshop. I had to create a concept using my own ideas and influences. I
had decided to create an environment with a fantasy style creature, I had two
different developments that I created, the first one I cancelled because I was
really not liking how it was turning out, that environment was of a creature in
front of a tree in a forest open area, I didn’t like how it was looking overall
and I didn’t see how I could have improved on the fact it was looking
unsatisfactory so I decided to create a backup environment. This environment is
of a secluded cliff side looking over a lake with mountains in the background.
Before I could start to create my concept I researched into how I would create
the concept. I first decided how to start my concept by doing sketches and
iteration sheets, using pictures I took or using the internet to get references
and influences. For my first idea (that I decided not to do) I had used pieces
of natural material to create different environments so I could sketch over the
scenery I had created. Using the sketch I then started to add my ideas such as
the creature and foliage. With the second design I had started to draw environments
from a further distance so that I could fit more on and have a vaster concept with
more to look at and giving me an opportunity to add in little extra details,
like the person camping inside the cliff.
I used Photoshop to create my 2D concept. I used Photoshop to
create this concept and used soft brushes then blending and then the pen tool
for refining the soft edges. I was very influenced by an artist called Benedick
Bana and his art piece “Mystic Night”. I think I was very influenced by my own
self, most of the concept was created by my own memory of places I have visited
before, and this would be my main influence because I prefer to draw from
memory and it helps me to manipulate it how I would prefer the idea to look.
I had quite a few problems with this project such as the
colour picker issue and also the issue with me changing the concept completely,
but I managed to sort out these problems by working as hard as I could to fix
them. For the starting again I just draw as fast as I could with full
concentration to try and get a design that I was happy with, and I am proud
that I have managed to achieve this.
I used quite a lot of references that were my own such as the
scenery that I created with the materials that we have in the classroom and
also to get textures for my cliff. I also used secondary resources from the
internet for the god rays. I created many experiments to help me through this
project such as colour, material, anatomy, and also iteration sheets. These
were very useful for me because it helped me to know what exactly I wanted to
do with my concept.
I am pleased with how my work turned out. I was worried that
starting again would hold me back too far that I would not be able finish the
concept on time. I like how my concept looks, and how I have managed to create
some really nice textures as well as the perspective. But I have managed to finish
my concept on time and to a quality that I am very pleased with. I could
develop the textures of the rocks and water as well as the lighting from the
sun. I could have made everything easier by practising more and more on
creating the textures so that they could be more detailed. I would have liked
to have spent more time on my blog work.
Bibliography:
https://www.bds.org.uk/index.php/advice-education/species/muntjac-deer
https://www.bds.org.uk/index.php/advice-education/species/roe-deer
https://www.nationalgeographic.com/photography/photo-of-the-day/2011/2/hares-italy/
http://www.woburnsafari.co.uk/discover/meet-the-animals/mammals/african-crested-porcupine/
https://commons.wikimedia.org/wiki/File:Hystrix_indica_(Indian_Crested_Porcupine_spines)_at_IG_Zoological_park,_Visakhapatnam_03.JPG
https://www.google.co.uk/imgres?imgurl=https%3A%2F%2Fvignette.wikia.nocookie.net%2Fdisney%2Fimages%2F5%2F5e%2FLion-king-disneyscreencaps.com-8625.jpg%2Frevision%2Flatest%3Fcb%3D20150921194404&imgrefurl=http%3A%2F%2Fdisney.wikia.com%2Fwiki%2FScar&docid=9a1CMzdaNJC1VM&tbnid=aO0x9QNY3kaFBM%3A&vet=10ahUKEwiSwuWknorbAhUKJMAKHW3CDvAQMwj_ASgyMDI..i&w=1920&h=1080&safe=active&bih=466&biw=594&q=lion%20king%20cliff&ved=0ahUKEwiSwuWknorbAhUKJMAKHW3CDvAQMwj_ASgyMDI&iact=mrc&uact=8#h=1080&imgdii=aO0x9QNY3kaFBM:&vet=10ahUKEwiSwuWknorbAhUKJMAKHW3CDvAQMwj_ASgyMDI..i&w=1920
http://www.lpzoo.org/blog/right-tail-task
http://www.bbc.co.uk/nature/life/European_Hare
http://stagantlers.co.uk/
https://similarbutdifferentanimals.com/2017/06/28/hedgehog-or-porcupine-spines/
https://www.pinterest.co.uk/pin/354588170639101367/?autologin=true
http://ocean.si.edu/bioluminescence
http://www.longlongtrail.co.uk/soldiers/a-soldiers-life-1914-1918/life-in-the-trenches-of-the-first-world-war/
https://www.iwm.org.uk/history/10-photos-of-life-in-the-trenches
https://www.youtube.com/watch?v=s77y2zU2a8g
http://www.thestudymcr.com/collections/human-remains/hare-skull/
https://interfacelift.com/wallpaper/details/3169/taft_point_%40_yosemite%2C_california.html
https://www.artstation.com/artwork/5WRAO
https://www.quora.com/Why-does-the-gaming-industry-use-the-term-God-Rays-when-referring-to-Crepuscular-Rays-aka-Sunburst-Where-did-it-come-from

Comments
Post a Comment